Introduction
In a world increasingly dominated by digital transactions, writing a check might seem like a relic from the past. However, there are still plenty of situations where knowing how to write a check is crucial. Whether paying rent, donating, or handling a business transaction, writing a check correctly is a valuable skill. In this detailed instructional guide, we’ll walk you through each step of writing a check, ensuring you’re well-prepared for any situation that requires it.
Why Writing a Check Still Matters
Despite the rise of online banking and mobile payment apps, checks remain a widely accepted form of payment. They provide a paper trail, which can be beneficial for keeping records and managing finances. Plus, there are instances where digital payments aren’t an option, making checks a reliable alternative.
Understanding the Components of a Check
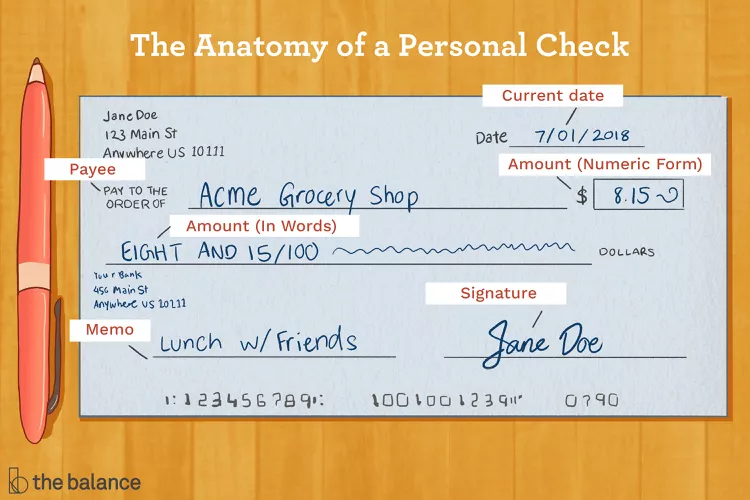
Before we dive into the steps, let’s break down the anatomy of a check. Knowing what each part represents will help you how to write a check accurately.
- Date Line: The date when the check is written.
- Payee Line: The name of the person or organization to whom the check is being issued.
- Dollar Box: The amount of the check in numerical form.
- Amount Line: The amount of the check in words.
- Memo Line: A space to note the reason for the payment.
- Signature Line: Where the check writer signs their name.
- Bank Information: The bank’s name and address where the check writer has an account.
- Routing Number: A nine-digit code that identifies the bank.
- Account Number: The check writer’s account number at the bank.
- Check Number: A unique identifier for each check.
Step-by-Step Guide to how to write a check
Now that you’re familiar with the parts of a check, let’s get into the nitty-gritty of writing one. Follow these steps to ensure your check is correctly filled out now we will know how to write a check.
1. Date the Check

Start by writing the date on the line in the upper right-hand corner. This helps the payee and the bank know when the check was issued. You can write the date in various formats, such as “August 1, 2024” or “08/01/2024.”
2. Write the Payee’s Name

On the “Pay to the Order of” line, write the name of the person or organization you’re paying. Make sure to spell it correctly to avoid any issues with the check being cashed or deposited. If you’re unsure of the exact name, you can ask the recipient for clarification.
3. Enter the Payment Amount in Numbers

In the dollar box, write the amount of the check in numerical form. For example, if you’re paying $130.45, write “130.45” in the box. Be sure to write clearly and align the numbers correctly within the box.
4. Write the Payment Amount in Words
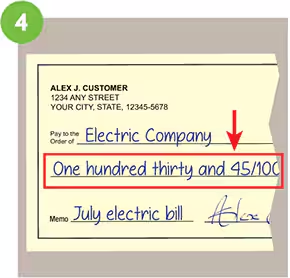
On the line below the payee’s name, write the amount in words. This is a crucial step, as the written amount will be used if there’s a discrepancy between the numerical and written amounts. For $130.45, you would write “One hundred fifty and 75/100.” Add “and” to separate dollars and cents, and draw a line to fill any remaining space.
5. Fill in the Memo Line
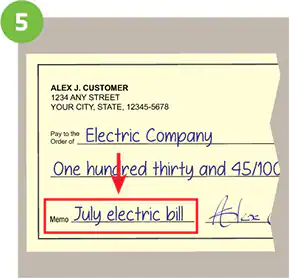
The memo line is optional but can be helpful for record-keeping. Use this space to note the purpose of the payment, such as “August rent” or “Donation.” This can be particularly useful when reviewing your bank statements later on.
6. Sign the Check
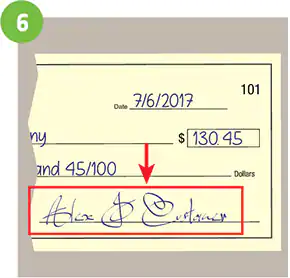
The signature line is one of the most important parts of the check. Sign your name exactly as it appears on your bank account. A check without a signature is invalid and will not be processed by the bank.
Additional Tips for Writing a Check
- Use a pen: Always use a pen, preferably blue or black ink, to write a check. This prevents alterations and ensures the check is permanent.
- Avoid mistakes: Double-check all the information before signing. If you make an error, it’s best to void the check and start over.
- Keep records: Maintain a record of your checks in a check register. This helps you keep track of your spending and ensures you don’t overdraw your account.
Common Mistakes to Avoid
Writing a check might seem straightforward, but there are common pitfalls that can cause issues. Here’s what to watch out for:
- Incorrect date: Ensure the date is current to avoid delays in processing.
- Spelling errors: Double-check the payee’s name and the written amount to prevent the check from being rejected.
- Mismatched amounts: Make sure the numerical and written amounts match exactly.
- Unsigned checks: Always remember to sign the check to make it valid.
FAQs About Writing a Check
Q: Can I write a check in pencil?
A: No, you should always use a pen to write a check. Pencil can be easily erased or altered, which can lead to fraud or the check being rejected.
Q: What happens if I make a mistake on a check?
A: If you make a mistake, it’s best to void the check and start over. Write “VOID” across the front of the check and keep it for your records. Then, write a new check with the correct information.
Q: Can someone else fill out a check for me?
A: In general, the account holder should fill out the check. However, if someone else must do it, ensure they have your permission and sign the check yourself.
Q: How long is a check valid?
A: Most checks are valid for six months from the date of issue. However, some checks, like those from government agencies, may have different expiration periods. It’s best to cash or deposit checks promptly.
Conclusion
Knowing how to write a check is a fundamental skill that can come in handy in various situations. Whether you’re paying bills, making a purchase, or sending a gift, writing a check correctly ensures your payment is processed smoothly. By following the steps outlined in this detailed instructional guide, you’ll be able to write checks with confidence and avoid common mistakes. So, the next time you need to write a check, you’ll know exactly what to do!
More Blog on – basicinfohub
